Growing mushrooms at home can feel like a small act of magic: you start with a plastic bin, some grain, and a handful of humble ingredients, and a few weeks later you’re holding clusters of fresh fungi you grew yourself. The monotub method has become one of the most popular approaches for home cultivators because it’s affordable, relatively simple, and surprisingly forgiving once you understand the basics. Whether you’re growing gourmet oyster mushrooms or exploring other species, a monotub setup gives you a controlled environment without needing a dedicated grow room or expensive equipment. This guide walks you through every stage of the process, from building your first tub to pulling your third flush. Take it one step at a time, and you’ll be surprised how quickly it all clicks.
Essentials of Monotub Design and Preparation
Before you mix a single grain of spawn, you need a well-designed growing chamber. The monotub itself is just a large plastic storage bin with strategically placed holes, but getting the details right here sets the stage for everything that follows. Think of this as building a tiny ecosystem: your mushrooms need consistent humidity, gentle airflow, and protection from contaminants. A few hours of careful preparation now saves you weeks of frustration later.
Selecting and Modifying Your Plastic Bin
The standard choice is a 54- to 66-quart clear or translucent plastic tote with a latching lid. Brands like Sterilite and Iris are popular because they’re sturdy, widely available, and inexpensive. Clear tubs let you monitor colonization progress without opening the lid, which reduces contamination risk.
You want a tub that’s at least 12 inches deep. Shallower bins dry out too quickly and give your substrate less thermal mass to buffer temperature swings. Some growers prefer 106-quart tubs for larger batches, but if this is your first grow, stick with the 54- to 66-quart range. It’s easier to manage, and a smaller volume colonizes faster.
Avoid tubs with textured interiors or ribbed bottoms. Smooth surfaces are easier to clean and sanitize, and they allow your substrate cake to sit flat. If the only option at your local store has a slightly textured bottom, it’ll still work, but smooth is ideal.
Airflow Management: Holes, Polyfill, and Micropore Tape
Mushrooms need fresh air exchange to fruit properly, but they also need high humidity. Your hole placement balances these two competing needs. The most common configuration uses two holes on each long side of the tub, positioned about four to five inches from the bottom. Some designs add one or two holes near the top of each short side as well. Drill or cut these holes to roughly two inches in diameter.
You have two main options for covering the holes:
- Polyfill stuffing: Push loosely packed polyester fiberfill into each hole. This acts as a passive filter, allowing air to exchange while keeping contaminants out. The density of the stuffing controls how much airflow gets through. Looser packing means more air exchange and slightly lower humidity.
- Micropore tape: Medical-grade micropore tape (3M brand is the standard) can be layered over the holes instead. Two to three layers provide a good balance. Tape is easier to adjust than polyfill since you can simply peel off or add layers.
Either method works. Many experienced growers prefer micropore tape because it’s more consistent and easier to fine-tune. If you’re unsure, start with tape and adjust from there.
The lid usually doesn’t need additional holes if you’re using a standard unmodified monotub approach. Some growers flip the lid upside down or leave it slightly cracked during fruiting for extra air exchange, but that’s a decision you’ll make later in the process.
Sterilization and Sanitation Protocols
Contamination is the number one enemy of monotub mushrooms, and most contamination happens during preparation and inoculation. Your tub doesn’t need to be sterile in the medical sense, but it does need to be thoroughly sanitized.
Wash the tub and lid with hot soapy water first, then wipe every interior surface with 70% isopropyl alcohol. Not 90%, not 99%: 70% is actually more effective at killing microorganisms because the water content helps the alcohol penetrate cell walls. Let the alcohol air dry rather than wiping it off.
Your work area matters just as much as the tub itself. Before you handle any spawn or substrate, wipe down your table, your arms up to the elbows, and any tools you’ll use. A still air box (a large plastic bin with arm holes cut in one side) is a worthwhile investment if you plan to do any grain-to-grain transfers. For basic monotub work, though, a clean room with no drafts and a freshly wiped surface is usually sufficient.
Wear nitrile gloves. Wash them with isopropyl alcohol before touching anything. And here’s a small habit that makes a big difference: every time you set something down and pick it back up, give your gloves another quick spray. Contamination is often invisible until it’s too late, so treat sanitation as a constant practice rather than a one-time step.
Preparing the Ideal Bulk Substrate
Your substrate is the food source and growing medium for your mushrooms. Getting the recipe right and pasteurizing it properly are two of the most important steps in the entire monotub process. A well-prepared substrate resists contamination naturally, holds moisture consistently, and gives your mycelium everything it needs to colonize quickly.
The Coco Coir and Vermiculite CVG Formula
The CVG mix (coco coir, vermiculite, and gypsum) has become the gold standard for monotub substrates. It’s inexpensive, easy to prepare, and works beautifully for most commonly cultivated species.
Here’s a reliable recipe for a 54- to 66-quart tub:
- 650 grams of coco coir (one standard brick)
- 2 quarts of fine vermiculite
- 1 cup of gypsum powder (calcium sulfate)
Coco coir provides the bulk structure and holds moisture well. Vermiculite adds air pockets that help with water retention and drainage. Gypsum supplies calcium and sulfur while also preventing the substrate from clumping together. Some growers skip the gypsum, and the substrate still works, but including it tends to produce better yields.
Buy your coco coir from a reptile supply store or garden center. Make sure it’s pure coco coir with no added fertilizers or trichoderma (some gardening brands add trichoderma as a beneficial fungus for plants, but it’s a devastating contaminant for mushroom cultivation). The compressed bricks are the most convenient form.
Pasteurization Methods for Substrate Safety
Pasteurization kills most competing organisms while leaving the substrate biologically active enough for your mycelium to colonize. Full sterilization (as you’d do with grain spawn in a pressure cooker) isn’t necessary or even desirable for bulk substrate: some beneficial bacteria actually help your mycelium fight off contaminants.
The bucket tek method is the simplest approach:
- Break up your coco coir brick into a five-gallon bucket.
- Add the vermiculite and gypsum on top.
- Boil approximately 3.5 to 4 quarts of water.
- Pour the boiling water over the dry ingredients.
- Stir briefly to ensure even moisture distribution.
- Seal the bucket with a tight-fitting lid.
- Let it sit for at least 90 minutes, ideally overnight.
The boiling water raises the substrate temperature to pasteurization range (around 160 to 180 degrees Fahrenheit), and the sealed bucket holds that heat long enough to kill most contaminants. By the time you open it the next morning, the substrate has cooled to a workable temperature.
Some growers prefer oven pasteurization (holding the substrate at 170°F for 90 minutes in a covered roasting pan) for more precise temperature control. Both methods produce excellent results. The bucket tek is just faster and requires less equipment.
Achieving Proper Field Capacity
Field capacity is the maximum amount of water your substrate can hold without being waterlogged. Getting this right is critical. Too wet, and you’ll create anaerobic conditions that invite bacterial contamination. Too dry, and your mycelium will stall or produce tiny, stunted fruits.
The squeeze test is your best friend here. Grab a handful of cooled substrate and squeeze it firmly. You should see a few drops of water drip out, maybe a thin stream, but not a steady flow. If water pours out freely, the substrate is too wet. If nothing comes out at all, it’s too dry.
When the substrate is too wet, spread it out on a clean surface and let excess moisture evaporate for 15 to 20 minutes, then test again. If it’s too dry, mist it lightly with water from a spray bottle and mix thoroughly. Err slightly on the drier side if you’re unsure: it’s easier to add moisture during fruiting than to fix a waterlogged substrate.
The ideal substrate should feel like a wrung-out sponge. It holds together when you squeeze it but crumbles apart easily when you release your grip. Once you’ve hit field capacity a couple of times, you’ll recognize the feel instantly.
Inoculation and the Colonization Phase
This is where your project really comes alive. Inoculation is the moment you introduce your mushroom mycelium to its new home, and colonization is the waiting game that follows. Patience is your greatest asset during this phase. Resist the urge to open the tub and check progress every few hours: every time you crack that lid, you’re inviting contaminants in.
Mixing Fully Colonized Grain Spawn
Your grain spawn should be fully colonized before you mix it with your substrate. This means every grain in the jar or bag is covered with white mycelium, with no uncolonized spots remaining. Using partially colonized spawn dramatically increases your contamination risk because uncolonized grains are easy targets for mold and bacteria.
A standard spawn-to-substrate ratio falls between 1:2 and 1:4 by volume. For a 54-quart tub, this typically means two to three quarts of colonized grain spawn mixed with six to eight quarts of prepared CVG substrate. Higher spawn ratios (closer to 1:2) colonize faster and resist contamination better, but they use more spawn. Lower ratios (1:4 or beyond) save spawn but colonize more slowly and carry higher contamination risk.
If you’re new to growing monotub mushrooms, lean toward a higher spawn ratio. The faster colonization time is worth the extra spawn, especially while you’re still dialing in your sanitation practices.
Break up your colonized grain spawn before mixing. Shake the jars or knead the bags to separate individual grains. Clumped spawn creates uneven colonization and can leave pockets of uncolonized substrate vulnerable to contamination.
Layering Techniques and Casing Layers
There are two main approaches to filling your tub: mixing and layering. The mixed method simply combines all your spawn and substrate together, distributes the mixture evenly in the tub, and presses it down gently to a uniform depth of three to four inches. This is the most common approach and works well for most species.
The layered approach alternates between substrate and spawn: a thin base layer of substrate on the bottom, then a layer of spawn, then more substrate, then more spawn, finishing with a thin top layer of pure substrate. Layering can encourage more even colonization, but honestly, the difference in results between mixing and layering is minimal for most growers.
A casing layer is a thin (quarter-inch to half-inch) top layer of substrate, vermiculite, or a specialized casing mix applied over the surface. The casing layer helps maintain surface humidity and creates a favorable microclimate for pinning. For many common species, a simple layer of CVG substrate on top works perfectly as a casing.
Press the surface gently with clean, gloved hands or the bottom of a sanitized container. You want a flat, even surface, but don’t compact it too tightly. The mycelium needs some air space within the substrate to grow efficiently.
Incubation Conditions and Darkness Requirements
Once your tub is packed, snap the lid on tight and place it somewhere with stable temperatures between 75 and 80 degrees Fahrenheit. A closet, a shelf in a spare room, or even a cabinet works fine. The key is temperature consistency: avoid locations near exterior walls, heating vents, or windows where temperatures fluctuate throughout the day.
Complete darkness isn’t strictly necessary during colonization, but it helps. Light won’t damage the mycelium, but it can trigger premature pinning before the substrate is fully colonized. A dark closet is ideal. If that’s not available, draping a towel or blanket over the tub works just as well.
Colonization typically takes 10 to 14 days, though it can vary based on species, spawn ratio, and temperature. You’ll see white mycelium spreading across the surface, eventually covering it completely. Don’t open the tub during this time. Check progress through the clear sides and lid.
You’re looking for at least 75% surface colonization before moving to fruiting conditions, though 100% is better. If you see any green, black, or orange patches, that’s contamination. Small spots of contamination can sometimes be cut out with a sanitized knife, but if more than 10% of the surface is affected, it’s usually best to start over rather than risk a compromised grow.
Inducing Fruiting Conditions
The transition from colonization to fruiting is one of the most exciting moments in the monotub process. You’re essentially telling your mycelium that conditions have changed and it’s time to produce mushrooms. This shift involves introducing fresh air, adjusting humidity, adding some light, and often dropping the temperature slightly.
Optimizing Humidity and Fresh Air Exchange (FAE)
Mushrooms are roughly 90% water, so humidity is non-negotiable. Your monotub should maintain relative humidity between 85% and 95% during fruiting. The good news is that a properly hydrated substrate in a closed tub naturally creates this humidity level. Your job is to maintain it while also providing enough fresh air for the mushrooms to develop properly.
Fresh air exchange is what triggers pinning (the formation of tiny mushroom primordia on the surface). During colonization, CO2 builds up inside the sealed tub. When you introduce fresh air, the drop in CO2 concentration signals the mycelium to start fruiting.
If you’re using a standard monotub with polyfill or micropore tape over the holes, passive air exchange often handles this automatically. The holes allow a slow, steady exchange of air without dramatically dropping humidity. If you notice that your surface conditions look dry or that pins aren’t forming after a week of fruiting conditions, you may need to fan the tub manually once or twice a day. Simply remove the lid, fan the opening with the lid itself for 30 seconds, and replace it.
Misting is another tool in your kit. Use a fine mist sprayer and aim upward so the mist settles gently on the surface. Never spray directly onto pins or developing mushrooms: direct water can damage them and invite bacterial blotch. Mist the sides of the tub and the underside of the lid instead. You want to see tiny water droplets on the surface of the substrate, sometimes called “dew point” conditions. If the surface looks dry and matte, it needs misting. If water is pooling, you’ve overdone it.
Lighting Schedules and Temperature Control
Mushrooms don’t photosynthesize, so they don’t need light for energy. However, light serves as a directional cue that tells the mushrooms which way is “up.” A simple 12-hours-on, 12-hours-off cycle using ambient room light or a small LED desk lamp is plenty. The light doesn’t need to be intense: even the indirect light from a nearby window works. Avoid direct sunlight, though, as it can overheat the tub.
Temperature during fruiting should drop slightly from colonization temps. Most commonly cultivated species fruit best between 68 and 74 degrees Fahrenheit. This cooler temperature, combined with fresh air and light, sends a strong fruiting signal to the mycelium.
If your growing space is warmer than ideal, you have a few options. A small fan in the room (not pointed directly at the tub) can help circulate air and provide slight evaporative cooling. Some growers place their tubs in a basement or air-conditioned room during summer months. Extreme heat above 80°F can stall fruiting entirely, so temperature management is worth paying attention to.
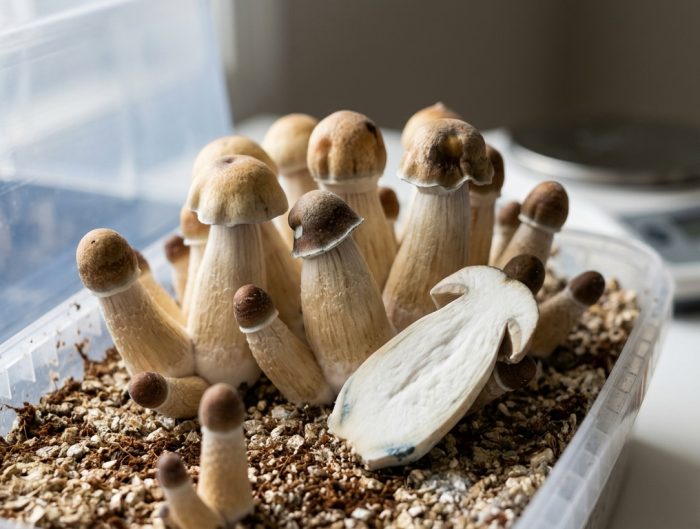
You should start seeing tiny white bumps (primordia or “pins”) forming on the substrate surface within 5 to 10 days of introducing fruiting conditions. These pins will double in size rapidly over the next few days, developing into recognizable mushroom shapes. This is the most rewarding part of the process: watching your monotub mushrooms emerge from what was recently just a white, mycelium-covered surface.
Harvesting and Managing Multiple Flushes
Your patience has paid off, and you’re staring at a tub full of mushrooms. The harvest window matters more than you might think, and how you handle the tub afterward determines whether you’ll get a second, third, or even fourth flush of fruits.
Identifying the Perfect Time to Pick
The ideal harvest window depends on your species, but for most commonly grown varieties, you want to pick just before or as the caps begin to flatten out. In the early stages, caps are convex and rounded. As they mature, they flatten and eventually turn slightly concave (curving upward at the edges). Harvesting just as the caps begin to flatten gives you the best balance of size and potency.
For species where the veil is visible (a thin membrane connecting the cap edge to the stem), harvest just as the veil begins to tear. This is the classic indicator that the mushroom has reached maturity but hasn’t yet begun dropping spores. Spore drop isn’t harmful, but it creates a dark, messy layer on the substrate surface that can inhibit future flushes.
To harvest, grip the mushroom gently at the base of the stem and twist while pulling upward. A clean twist-and-pull minimizes damage to the substrate. Some growers prefer to use a clean, sharp knife to cut mushrooms at the base instead. Either method works. If you’re cutting, sanitize the blade between cuts.
Harvest all mature mushrooms at once, even if some are smaller than you’d like. Leaving mature mushrooms on the cake while waiting for smaller ones to catch up wastes the substrate’s energy and delays your next flush. Pick everything that’s ready, and the smaller pins will often continue developing or reappear in the next flush.
Rehydrating the Cake for Subsequent Harvests
After your first harvest, the substrate cake has lost a significant amount of water. Rehydration (often called “dunking”) replenishes this moisture and prepares the cake for another round of fruiting.
The process is straightforward:
- Remove any remaining stumps or aborted pins from the surface.
- Fill the tub with cool, clean water until the cake is submerged. If the cake floats, place a sanitized plate or lid on top to weigh it down.
- Let it soak for 12 to 24 hours. Longer soaks aren’t better: over-soaking can waterlog the cake and promote bacterial growth.
- Drain all the water from the tub. Tilt the tub carefully and pour off the excess.
- Replace the lid and return to fruiting conditions.
You should see new pins forming within 5 to 10 days after rehydration. Second flushes often produce fewer but larger individual mushrooms. Third and fourth flushes are common, though yields decrease with each cycle. Most growers find that the first two flushes account for roughly 70 to 80% of total yield.
Between flushes, keep an eye out for contamination. The substrate becomes more vulnerable after each harvest because the mycelium’s defenses weaken over time. If you see green mold spreading, it’s usually time to retire that cake and start fresh.
Troubleshooting Common Monotub Challenges
Even with careful preparation, things don’t always go according to plan. Here are the issues that trip up most growers, along with practical fixes.
Contamination is the most common problem. Green mold (Trichoderma) is the usual culprit, appearing as bright green patches on the substrate surface. If you catch it early and it’s confined to a small area, you can try removing the affected section with a sanitized spoon and applying salt or hydrogen peroxide to the spot. But if the green is spreading rapidly or covers more than a small patch, the grow is likely compromised. Prevention is always better than treatment: focus on clean grain spawn, proper pasteurization, and consistent sanitation habits.
Overlay happens when the mycelium forms a thick, dense mat on the substrate surface that prevents pins from forming. This usually results from too much CO2 and not enough fresh air exchange during early fruiting. If you notice a thick, almost leathery mycelial surface, increase your FAE by fanning more frequently or loosening your polyfill. Gently scraping the surface with a sanitized fork (called “forking the cake”) can also break up the overlay and encourage pinning.
Side and bottom pinning occurs when mushrooms form on the sides or bottom of the cake rather than the top surface. This happens because the microclimate between the cake and the tub walls is often more humid than the surface. A black plastic liner inside the tub prevents this by shrinking with the cake as it colonizes, eliminating the gap where side pins would form. If you didn’t use a liner and you’re getting side pins, you can still harvest them by carefully tilting the cake out of the tub.
Fuzzy feet (thick, white, cottony growth at the base of the stems) indicate insufficient fresh air exchange. The mushrooms are reaching upward trying to find fresh air. Increase your fanning frequency or adjust your hole coverings to allow more passive airflow. Fuzzy feet don’t ruin your harvest, but they do signal that your mushrooms could be growing in better conditions.
Slow or stalled colonization can result from temperatures that are too low, spawn that wasn’t fully colonized before mixing, or a substrate that’s too wet. Check your temperature first: if the tub is sitting below 70°F, colonization will crawl. Move it somewhere warmer. If the substrate smells sour or looks waterlogged, excess moisture may be the issue, and unfortunately, there’s no easy fix for an overly wet substrate once it’s in the tub. Take note for your next batch.
No pinning despite full colonization and proper fruiting conditions is frustrating but usually fixable. Double-check your humidity (mist if needed), make sure you’re providing some light, and confirm that the temperature has dropped from colonization levels. Sometimes a dramatic temperature swing, like dropping from 75°F to 65°F overnight, can shock the mycelium into fruiting. Patience matters here too: some grows simply take longer than expected.
At Healing Dose, we often talk about the value of keeping a journal through any process where you’re observing subtle changes over time. The same principle applies beautifully to mushroom cultivation. Recording your substrate recipe, spawn ratio, temperatures, timeline, and observations for each grow creates a personal reference that’s far more valuable than any generic guide. Over several grows, you’ll start noticing patterns: what works in your specific environment, what doesn’t, and where your process needs adjustment. This kind of reflective practice, paying close attention and recording what you notice, is a skill that transfers well beyond the grow room.
Your Next Steps
Growing mushrooms in a monotub is one of those skills that seems complicated from the outside but becomes second nature with practice. The core process is simple: prepare a clean tub, mix pasteurized substrate with colonized grain spawn, wait for colonization, introduce fruiting conditions, and harvest. Every detail we’ve covered, from hole placement to field capacity to rehydration timing, serves that basic framework.
Start with one tub. Keep it simple. Use the CVG recipe, maintain good sanitation, and be patient during colonization. Your first grow probably won’t be perfect, and that’s completely fine. Each batch teaches you something new about the process and about your specific growing environment.
If you’re exploring mushroom cultivation as part of a broader interest in fungi and their potential, Healing Dose offers resources to help you approach that journey thoughtfully. For those curious about where to begin with microdosing, our short quiz can help you find your starting point based on your goals, experience, and sensitivity. Whatever path you’re on, take it one step at a time, keep notes, and trust the process.
You might also like