Growing mushrooms from a single bag might sound too simple to be true, but a psilocybe cubensis grow bag is genuinely one of the most beginner-friendly ways to cultivate at home. These self-contained systems hold everything the mycelium needs to colonize and fruit, which means you spend less time assembling complicated setups and more time learning the organism itself. If you’ve been curious about cultivation but felt intimidated by monotubs, pressure cookers, and grain-to-grain transfers, a grow bag is a forgiving place to start. The process still requires patience and attention to cleanliness, but the learning curve is far gentler than most people expect. This guide walks through every phase: from understanding what’s inside the bag to pulling your first flush and beyond.
Understanding All-In-One Grow Bag Mechanics
All-in-one grow bags are designed to simplify what would otherwise be a multi-step, multi-container process. In a traditional setup, you’d prepare grain spawn separately, sterilize a bulk substrate, combine them in a fruiting chamber, and manage each stage with different equipment. An all-in-one bag collapses all of that into a single, sealed environment.
The bag itself is typically made of polypropylene, a heat-resistant plastic that can withstand the high temperatures of pressure sterilization. Manufacturers pre-load the bag with both a nutrient-rich grain layer and a bulk substrate layer, sterilize the entire thing, and seal it with a specialized filter patch. When it arrives at your door, the interior is sterile and ready for inoculation. Your job is simply to introduce your chosen genetics (spore syringe or liquid culture) without letting contaminants sneak in.
What makes these bags particularly appealing for first-time growers is the reduced number of failure points. Every time you transfer material between containers or open a lid, you create an opportunity for contamination. With a cubensis grow bag, you’re working through a single injection port, and the bag stays sealed through colonization. That dramatically lowers your risk.
Substrate and Grain Layers
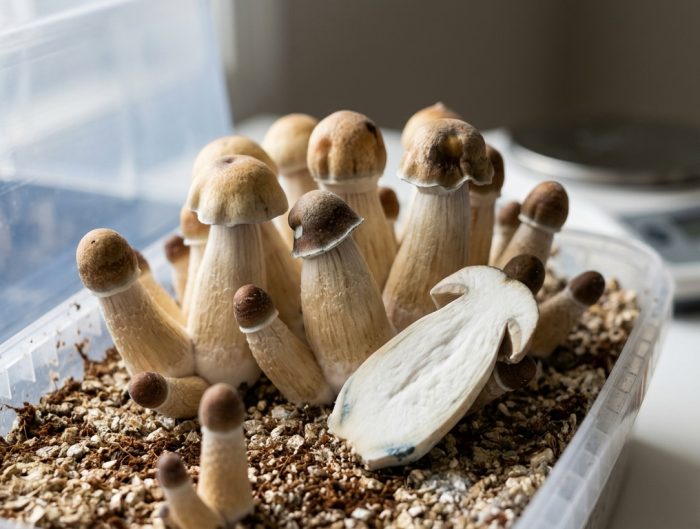
If you look at an all-in-one bag before inoculation, you’ll notice two distinct layers separated by a visible line. The bottom layer is typically a hydrated grain: rye berries, millet, or sometimes a mix of both. This grain serves as the initial food source for the mycelium. It’s packed with starches and nutrients that encourage rapid colonization.
Above the grain sits the bulk substrate layer. This is usually a blend of coco coir, vermiculite, and sometimes gypsum. Coco coir holds moisture well and provides a structure the mycelium can spread through easily. Vermiculite adds air pockets and additional water retention. Gypsum, when included, provides calcium and sulfur while helping prevent the substrate from clumping.
The idea is straightforward: the mycelium colonizes the nutrient-dense grain first, building strength and mass. Once you mix the colonized grain into the bulk substrate (the “break and shake” step, which we’ll cover later), the mycelium has enough momentum to colonize the less nutritious but more expansive substrate layer. Think of the grain as a starter culture and the substrate as the field where fruiting actually happens.
One thing worth paying attention to is the moisture content. A well-prepared bag will have grain that looks plump but not dripping, and substrate that feels damp but not waterlogged. If you squeeze the bag gently and see pooling water at the bottom, that’s a red flag: excess moisture invites bacterial contamination.
The Role of the Micron Filter Patch
Every quality grow bag includes a small square of synthetic filter material, usually rated at 0.2 or 0.5 microns. This patch serves a dual purpose that’s easy to overlook but absolutely critical to the process.
First, the filter allows gas exchange. Mycelium is a living organism that respires: it consumes oxygen and releases carbon dioxide. Without some form of air exchange, CO2 would build up inside the sealed bag, eventually stalling or killing the mycelium. The filter patch lets gases pass through while the bag remains otherwise sealed.
Second, and perhaps more importantly, the filter blocks airborne contaminants. Mold spores, bacteria, and other microorganisms are everywhere in your home environment. They’re on your skin, floating in the air, and sitting on every surface. A 0.5-micron filter is small enough to prevent the vast majority of these organisms from entering the bag. For reference, most mold spores range from 2 to 20 microns, so even a 0.5-micron filter provides a comfortable margin of safety.
You should never cover this patch with tape during colonization, even though some older guides suggest it. The mycelium needs to breathe from day one. The only time you’d tape over the filter is during long-term storage of an uninoculated bag, and even then, many growers skip it.
Preparation and Sterile Inoculation
This is the phase where most contamination happens. Everything you’ve read about sterile technique in mushroom cultivation applies here, but the good news is that working with a pre-sterilized bag makes the process much simpler than working with open containers. You’re essentially protecting a single injection point rather than managing an entire sterile workspace.
Your goal during inoculation is simple: get your spore solution or liquid culture into the bag without introducing anything else. That’s it. The bag is already sterile inside. The grain and substrate are ready. You just need to be the clean bridge between your genetics and the growing medium.
I remember my first inoculation feeling almost anticlimactic: all that preparation for about 30 seconds of actual work. But those 30 seconds matter enormously. A moment of carelessness here can mean weeks of waiting only to discover green mold spreading through your grain. So take the preparation seriously, even if the actual injection feels quick.
Sanitizing Your Workspace
Start by choosing a small, enclosed room with minimal airflow. A bathroom with the ventilation fan turned off works well. Avoid kitchens (too many organic particles in the air) and rooms with open windows. If you have a still air box, even better: that’s a clear plastic tub with arm holes cut into the sides, designed to create a pocket of still air where contaminants are less likely to drift onto your work.
Before you begin, wipe down every surface within arm’s reach using 70% isopropyl alcohol. Not 90%, not 99%: 70% is actually more effective at killing microorganisms because the water content helps the alcohol penetrate cell walls. Wipe the table, the outside of the grow bag, your spore syringe, and anything else you’ll touch during the process.
Here’s a practical checklist for your workspace:
- 70% isopropyl alcohol in a spray bottle
- Clean paper towels or lint-free wipes
- A lighter or alcohol lamp for flame sterilization
- Your spore syringe or liquid culture syringe
- The grow bag, wiped down externally
- Micropore tape (to cover the injection site afterward)
- Latex or nitrile gloves, sprayed with alcohol
Wash your hands thoroughly, then put on gloves and spray them with alcohol. Some growers also wear a face mask to reduce the chance of breathing contaminants onto the injection port. It might feel like overkill, but every small precaution stacks in your favor.
Turn off any fans, air conditioning, or heating systems that might create air currents in the room. Even a gentle breeze can carry thousands of contaminant spores directly to your injection site.
Injecting Spores or Liquid Culture
You have two main options for inoculation: a spore syringe or a liquid culture syringe. Spore syringes contain microscopic spores suspended in sterile water. They’re widely available and inexpensive, but colonization tends to be slower because the spores need to germinate before mycelium can form. Liquid culture syringes contain living mycelium already growing in a nutrient solution, which means colonization begins almost immediately and tends to be faster and more vigorous.
For beginners, either option works. Liquid culture gives you a speed advantage, typically shaving a week or more off colonization time, but spore syringes are perfectly effective and often easier to source.
Here’s the inoculation process step by step:
- Shake your syringe gently to distribute the spores or culture evenly.
- Remove the syringe cap and flame-sterilize the needle until it glows red. Let it cool for 10 to 15 seconds: don’t touch it to anything.
- Locate the injection port on your grow bag. This is usually a small, self-sealing rubber disc.
- Wipe the injection port with an alcohol-soaked pad.
- Insert the needle through the port and inject 2 to 5 cc of solution directly into the grain layer. Aim for the grain, not the substrate above it.
- Withdraw the needle and immediately cover the injection site with a small piece of micropore tape for extra protection.
That’s it. The whole injection takes less than a minute. Seal everything up, label the bag with the date and strain, and move it to your colonization area.
One common mistake is injecting too much solution. More is not better here. Excess liquid can pool in the grain and create conditions favorable to bacteria. Stick to the 2 to 5 cc range.
Managing the Colonization Phase
After inoculation, the waiting begins. Colonization is the period where the mycelium spreads through the grain, consuming nutrients and building the network it will eventually use to produce mushrooms. This phase requires patience above all else. You’ll be tempted to check the bag constantly, squeeze it, hold it up to the light, and generally fuss over it. Try to resist.
The mycelium doesn’t need much from you during this stage. It needs stable conditions and to be left alone. Your main responsibilities are maintaining the right temperature, providing appropriate light exposure, and knowing when to perform the break and shake.
At Healing Dose, we often emphasize that the cultivation process itself can be a form of practice in patience and presence. There’s a parallel between waiting for mycelium to colonize and the slow, cumulative nature of personal growth work: the changes happen gradually, often invisibly, and rushing the process rarely helps.
Ideal Temperature and Light Conditions
Psilocybe cubensis mycelium colonizes most efficiently between 75 and 80 degrees Fahrenheit (24 to 27 Celsius). Temperatures below 70°F will slow colonization significantly, sometimes to a crawl. Temperatures above 85°F can stress the mycelium and create conditions that favor bacterial contamination, since bacteria tend to thrive in warmer environments.
A consistent temperature matters more than hitting a perfect number. Fluctuations of 10 degrees or more between day and night can stress the mycelium and slow its progress. If your home temperature swings widely, consider placing the bag in a closet (which tends to have more stable temperatures) or using a seedling heat mat with a thermostat controller.
Regarding light: mycelium does not need light to colonize. In fact, many growers keep their bags in complete darkness during this phase. Indirect ambient light won’t harm anything, but direct sunlight will heat the bag unevenly and could promote contamination. A dark closet or a shelf away from windows works perfectly.
You should start seeing the first signs of mycelial growth within 5 to 14 days after inoculation, depending on whether you used spores or liquid culture. Look for small white patches spreading outward from where you injected. If you see any colors other than white: green, black, orange, pink: that’s contamination, and the bag should be discarded. Don’t try to save it. The risk of spreading contaminants to your growing space isn’t worth it.
The Break and Shake Technique
Once the grain layer is approximately 30 to 40 percent colonized (you’ll see white mycelium covering roughly a third of the visible grain), it’s time for the break and shake. This is exactly what it sounds like: you break up the colonized grain by massaging the bag and redistribute the mycelium throughout the uncolonized grain.
The purpose is to speed up colonization dramatically. Instead of the mycelium slowly expanding outward from a single point, you’re scattering colonized grain pieces throughout the bag, creating dozens of new growth points. What might take three more weeks from a single colonization front can happen in one week after a good break and shake.
Be firm but not violent. Squeeze and knead the grain layer through the bag until the clumps are broken apart and the white mycelial growth is distributed evenly. Avoid disturbing the substrate layer above the grain if possible: you don’t want to mix the two layers yet.
After the break and shake, the bag might look alarming. All that beautiful white growth you watched develop is now scattered and the bag looks like it’s starting over. Don’t worry. Within 48 to 72 hours, you’ll see new growth exploding from all the redistributed pieces, and full colonization of the grain layer often completes within 7 to 10 days.
Once the grain is fully colonized (solid white with no visible uncolonized grain), you can mix the colonized grain into the substrate layer. This is the step that prepares the bag for fruiting. Knead the bag thoroughly to distribute the grain evenly throughout the substrate, then let the entire bag colonize. This second colonization usually takes another 7 to 14 days.
Initiating the Fruiting Cycle
Full colonization of the substrate is your signal to shift from colonization conditions to fruiting conditions. The mycelium has built its network and stored enough energy to produce mushrooms. Now it needs environmental triggers that tell it the time is right.
In nature, Psilocybe cubensis fruits in response to changes in humidity, temperature, fresh air, and light. Your job is to mimic these triggers inside or around the grow bag. The transition from colonization to fruiting is one of the most exciting moments in the process: you’re about to see the first tiny pins (baby mushrooms) emerge from the substrate surface.
Introducing Fresh Air Exchange
During colonization, the sealed bag with its filter patch provided just enough gas exchange to keep the mycelium alive. For fruiting, the mycelium needs significantly more fresh air. High CO2 levels actually suppress pin formation, so reducing CO2 is one of the primary triggers for fruiting.
There are two main approaches to fresh air exchange with a grow bag. The first is to cut the top of the bag open, fold it down to create a shorter container, and place the open bag inside a fruiting chamber (a plastic tub with holes drilled in the sides, lined with damp perlite). This gives you the most control over humidity and airflow.
The second approach, which many beginners prefer for its simplicity, is to cut a large opening in the top of the bag, fold the edges outward to create a rim, and mist the inside of the bag directly. You’ll fan the opening several times a day to exchange air. This method is less controlled but works surprisingly well for a first grow.
Whichever method you choose, the goal is the same: reduce CO2 concentration around the substrate surface and introduce oxygen-rich air. You’ll want to fan the fruiting area 3 to 5 times per day for about 30 seconds each time. Some growers set a timer on their phone as a reminder.
A 12-hour light cycle also helps trigger fruiting. This doesn’t need to be intense grow lighting: a standard desk lamp or indirect daylight from a nearby window is plenty. The mycelium uses light as a directional cue for where to produce mushrooms, not as an energy source like plants do.
Maintaining Humidity Levels
Humidity is arguably the single most important factor during fruiting. Psilocybe cubensis needs surface humidity above 85 percent, ideally in the 90 to 95 percent range, to form pins and develop healthy fruiting bodies. If the substrate surface dries out, pinning stalls or stops entirely.
Misting is your primary tool for maintaining humidity. Use a fine-mist spray bottle and mist the sides of the bag or the walls of your fruiting chamber rather than spraying directly onto the pins. Direct water droplets on developing mushrooms can cause them to abort or develop bacterial blotches. You want the air to be humid, not the mushrooms to be wet.
A good rule of thumb: look for tiny water droplets forming on the substrate surface. Growers call these “micro-climates,” and they indicate the humidity is in the right range. If the surface looks dry and matte, mist more frequently. If you see standing water pooling on the surface, you’ve overdone it: fan more aggressively to evaporate the excess.
Temperature during fruiting can drop slightly from colonization temps. A range of 70 to 76°F (21 to 24°C) is ideal. The slight temperature drop from colonization conditions is actually another fruiting trigger, mimicking the natural cooling that occurs when tropical rainstorms roll through cubensis habitat.
Within 5 to 12 days of initiating fruiting conditions, you should see the first pins: tiny white bumps emerging from the substrate. These will double in size roughly every 24 hours once they get going. Watching your first pins develop into full mushrooms is genuinely thrilling, and it happens faster than most people expect.
Harvesting and Multiple Flushes
Your mushrooms will go from tiny pins to harvest-ready in about 5 to 7 days. The growth rate accelerates as they get larger, and in the final day or two before harvest, they can seem to grow visibly between morning and evening checks. Knowing exactly when to pick them is important for both potency and the health of future flushes.
Identifying the Right Time to Pick
The ideal harvest window is just before or just as the veil breaks. The veil is a thin membrane connecting the cap to the stem, covering the gills underneath. As the mushroom matures, the cap expands and the veil stretches until it tears away from the cap edge.
Harvesting just before the veil breaks is considered optimal for a few reasons. The mushroom has reached near-maximum potency relative to its weight. Once the veil breaks and the cap opens fully, the mushroom begins releasing spores, which coat the surrounding area in a dark purple-black dust. This spore dump doesn’t ruin anything, but it can suppress future pinning in the area it covers, and it makes the mushrooms look less appealing.
To harvest, grasp the mushroom gently at the base of the stem and twist while pulling upward. You want to remove the entire mushroom, including the base, without tearing up large chunks of substrate. Some growers prefer to use a clean, sharp knife to cut the mushroom at the substrate surface. Either method works: the key is being gentle with the surrounding substrate and any nearby pins that haven’t matured yet.
Not all mushrooms in a flush will mature at the same rate. You’ll likely need to harvest over 2 to 3 days, picking the largest ones first and letting the smaller ones catch up. This is completely normal and nothing to worry about.
After picking, you can eat mushrooms fresh or dry them for long-term storage. A food dehydrator set to 130 to 150°F is the most reliable drying method. Spread the mushrooms in a single layer and dry until they snap cleanly when bent: they should be cracker-dry with no flexibility. Store dried mushrooms in an airtight container with a food-grade desiccant packet.
Rehydrating the Bag for Future Harvests
Here’s something that surprises many first-time growers: your bag isn’t done after one harvest. A well-maintained substrate can produce 3 to 5 flushes, sometimes more. Each subsequent flush tends to produce fewer but sometimes larger mushrooms.
After harvesting your first flush, the substrate will have lost a significant amount of moisture. You need to rehydrate it before the next round of fruiting can begin. The simplest method for a grow bag is to pour clean, room-temperature water directly onto the substrate surface. Add enough water to create a shallow pool about half an inch deep on top of the substrate.
Let the bag sit with this water for 6 to 12 hours. The substrate will absorb the water like a sponge. After soaking, carefully pour off any excess water that hasn’t been absorbed. Then return the bag to fruiting conditions: same humidity, same fresh air exchange, same light cycle.
Pins for the second flush typically appear within 5 to 10 days after rehydration. The second flush is often the most productive, so don’t give up on your bag after the first harvest.
Between flushes, watch carefully for any signs of contamination. The substrate becomes more vulnerable to mold with each flush as its nutrient content decreases and the mycelium’s defenses weaken. Green or black patches mean it’s time to retire the bag. Composting spent substrate in an outdoor garden is a nice way to close the loop.
Troubleshooting Common Grow Bag Issues
Even with careful technique, problems come up. Knowing what you’re looking at and how to respond can save a grow or at least help you learn for next time.
If your grain shows no signs of colonization after 14 days, the most likely culprit is temperature. Double-check that your bag is staying consistently in the 75 to 80°F range. A close second is a bad syringe: spore syringes in particular can sometimes be duds, especially if they were stored improperly or are past their prime.
Green mold (Trichoderma) is the most common contaminant and the one you’ll learn to recognize immediately. It starts as a white patch that’s easy to confuse with mycelium but quickly turns green within 24 to 48 hours. If you see green, the bag is done. Don’t open it indoors: seal it and dispose of it outside. Trichoderma releases millions of spores that can contaminate your growing space for weeks.
Wet or sour-smelling grain usually indicates bacterial contamination, often caused by excess moisture in the bag or a compromised injection port. The grain may look slimy or discolored. Again, this bag should be discarded.
If your substrate is fully colonized but won’t pin, the issue is almost always environmental:
- Not enough fresh air exchange (high CO2 suppresses pinning)
- Humidity too low (substrate surface drying out)
- No light cycle (mycelium needs light as a pinning trigger)
- Temperature too high (try dropping to the low 70s)
“Fuzzy feet” on your mushrooms: white, fluffy growth at the base of the stems: is a sign of insufficient fresh air exchange. It’s not harmful, but it tells you to increase your fanning frequency.
Aborted pins, sometimes called “aborts,” are small mushrooms that stop growing and turn dark. A few aborts in every flush are normal. If most of your pins are aborting, check your humidity levels and make sure the substrate isn’t drying out between misting sessions.
One thing I’ve learned from personal experience is that your first grow is really about learning the process, not maximizing yield. If you get even a small harvest from your first bag, that’s a genuine success. Each subsequent grow gets easier as you develop an intuition for what the mycelium needs. At Healing Dose, we encourage people to approach cultivation with the same patience and self-compassion they’d bring to any new practice: notice what happened, reflect on what you might adjust, and try again.
If you’re growing cubensis as part of a broader interest in microdosing or personal exploration, getting your dosing right matters just as much as getting your cultivation technique dialed in. Everyone’s sensitivity is different, and what works for one person may be too much or too little for another. If you’re curious about finding a starting range that fits your goals and experience, take our short quiz to get a personalized suggestion you can adjust from there.
Growing from a psilocybe cubensis grow bag is one of those skills that feels mysterious until you’ve done it once. Then it just feels like gardening: attentive, rewarding, and a little humbling. Trust the process, keep things clean, and give the mycelium what it needs. The rest tends to take care of itself.
You might also like